Thursday, April 2, 2015

Amazing Cauliflower "Fried Rice"


Cauliflower “Fried Rice.” Make this. Trust me.

People ask me all the time if I follow a low carb diet. The answer is absolutely not. I prefer to think of it as a "smart" carb diet. For example: I eat lots of fruit. You know what is in fruit? Yep, carbohydrates. But the they are carbs your body can recognize and use to fuel your day. Do you know what is in that breakfast cereal bar you just ate? Probably not, unless you studied the label, but I can guarantee your there was a plethora of carbohydrates. The problem comes about when those carbs are actually factory created chemicals that smell good and look good, but are completely unrecognizable to the human body.

 So, yes, I choose to be as educated as I can about the food that goes into my body, including the sources of carbohydrates I include into my diet. I'm smart about them, But, no, I don't avoid them. There are definite times and places where grains make the recipe. Throw up your hands and rejoyce! This is not one of them. You'll never miss the rice. We actually told a little fib at dinner and told the kids this was just like the fried rice they love from our neighborhood sushi restaurant. They both ate an entire bowl and never once balked at the taste or texture of the cauliflower. Victory!

Anyway, needless to say I loved the way this turned out. I'm even planning to meal prep it next week for my lunches. 

As a little tip...You’ll want to marinade the pork for several hours or overnight. So make sure you allow yourself time for that. It’s a worthwhile step. Other than that, this recipe couldn't be easier. 

Here you go:

Marinade Recipe: In a zip lock bag combine the following-
3tsp minced garlic
2tbsp Tamari or Low sodium soy sauce
1tbsp dried minced onion flakes
1/4tsp black pepper
1tbsp sesame oil
1tbsp rice wine vinegar
1lb boneless, center cut pork, chops sliced into small thin pieces.

For the stir fry:
1tbsp sesame oil
2-3 tsp minced garlic
1 medium sized yellow onion, chopped
1c green sweet peas, I used frozen
3 scallions, finely chopped including stems
1c of shredded carrot
2 large eggs

For the “Rice”:
2 bags of pre-washed cauliflower florets or a large head of fresh cauliflower. Wash if necessary.
2-3 tbsp low sodium soy sauce
1 tbsp toasted sesame seeds

Directions:
Begin by ricing your cauliflower. Place the contents of one bag or ½ a head of cauliflower into the bowl of your food processor and pulse until it is the consistency and size of grains of rice. Pour into a bowl and set aside. Repeat with second bag or second ½ of the cauliflower.


In a very large pan, warm 1tbsp sesame oil over medium heat and sauté onion until translucent, about 4 minutes. Add garlic carrots, peas and scallions and cook until carrots have softened.

Next, push all the vegetables to the perimeter of pan and add the pork and marinade. Cook the pork thoroughly, but do not incorporate the vegetables until the pork is fully cooked, about 4 minutes depending on how large or small you cut the pieces of meat.


After the pork is fully cooked, combine it with the veggies by stirring gently and once again push the meat and vegetables to the outer edge of the pan. Crack one egg at a time into the center of the pan and season with salt and pepper. Scramble the eggs and incorporate them into the mixture.


You are ready for the final step. Retrieve your riced cauliflower and pour the entire bowl into your sauté pan. Before you stir, top the cauliflower with 2-3tbsp low sodium soy sauce and then stir to mix all the ingredients evenly. No need to really “cook” the cauliflower, just warm it through. 

Garnish each serving with 1/4 tbsp toasted sesame seeds and serve immediately.

*I also added a sprinkle of dried red chili flakes to my rice. I did not include this in the recipe because I prefer to keep my recipes more child-friendly. Personally, I think great either way, but the heat from the chilies is really tasty.


Hope you enjoy it!


Wednesday, February 11, 2015

Savory Sage & Butternut Squash Soup

Savory Sage and Butternut Squash Soup
For the past few weeks I've been participating in a nutrition and exercise challenge from the Barre3 Studio where I teach classes. I wanted to come up with some recipes that both satisfied my cravings for warm comfort food and fit within the guidelines of the challenge. One of my very favorite recipes born out of the challenge was this Savory Sage and Butternut Squash Soup. It is delicious and so simple that it can literally be made in 10 minutes. If you have dietary restrictions, you'll also be happy to hear that it is dairy free, soy free, gluten free and could very easily be nut free, if you choose. 

I paired this soup with a simple Greek Salad topped with grilled chicken. It is perfectly creamy and I love the natural sweetness of the squash paired with the sage. I think it's perfect for lunch or as a first course next time you host friends for dinner. I hope you enjoy it!


Ingredients
36oz of Fresh Butternut Squash cubes or 3 (12oz) bags of pre-sliced butternut squash cubes. (I buy Green Giant butternut squash cubes in the produce department near the bags of fresh broccoli, green beans, etc.)
1 tbsp coconut oil
¼ tsp dry sage
¼ tsp dried chili flakes
Salt to taste, at least ¼ tsp
Black pepper to taste
2 cups vegetable broth (I prefer Swanson’s 100% natural)
Dry Roasted Pepitas, Pumpkin Seeds or Sunflower seeds 
Serves 5

Method:

1.  Pierce each bag and place all three bags of butternut squash cubes in the microwave on high for 7 minutes. ***If using fresh squash and your prefer not to microwave steam the squash: Line a baking sheet with foil and grease with coconut oil or non-stick spray. Place squash cubes on the tray in a single layer and roast at 350 for 30-35 minutes or until softened and move on to step 2.

2. Pour broth, seasonings, coconut oil and cooked squash in a high speed blender and blend until completely smooth. Additional broth can be added if you prefer a thinner soup.

3.  Top each serving with 1 tbsp of seeds and enjoy.

Apple Pie Overnight Oats

Apple Pie Overnight Oats

It is no secret I'm in love with my Creamy Pumpkin Pie Overnight Oatmeal. I've been eating it every morning for months, but every now and then it's good to change things up. Fall fruits are my favorite to mix with oats...pumpkin, apples, raisins, cinnamon...its like having dessert for breakfast. I even joked with a friend today that I wake up every morning looking forward to breakfast...like skip the snooze button to get to the fridge and heat up my breakfast look forward to it. Plus, its little gift from heaven when the peanut butter gets all melty and gooey over the top of the oatmeal. Trust me, its amazing. I hope you love these as much as I do. Enjoy.


Ingredients:
1 large apple, any variety (I prefer Jazz or Fuji)
2 tbsp reduced sugar Craisins or raisins
1 tbsp coconut oil
1 packet of Stevia
¼ tbsp apple pie spice
2/3 cup old fashioned oats, not instant or 5-min oats
2 tbsp chia seeds
1 scoop of Whey protein, vanilla or cinnamon flavor
3/4 cup Unsweetened Vanilla Almond Milk
½ cup cottage cheese, 2 or 4% but not fat-free
½ tsp vanilla extract
¼ tsp cinnamon
2-3 tbsp real maple syrup
2 tbsp natural peanut butter or almond butter
*2 servings


Method: 
1   1. Clean and chop apple into small pieces, approximately 1/2 inch cubes .  Warm coconut oil over medium heat and add chopped apple, craisins/ raisins, apple pie spice and stevia.  Cook until apples are softened, but not mushy. Remove from heat and set aside.
2   2. In a mixing bowl, combine remaining ingredients and mix well.
3   3.  Divide oat mixture between two air-tight containers, such as mason jars.
4   4.  Top each jar with ½ the cooled apple mixture and refrigerate overnight.

5   5.  In the morning, warm oats for 1 minute and stir well. Microwave for an additional 20-30 seconds and stir again. Top with 1 tbsp of almond butter or peanut butter and enjoy.

Thursday, January 22, 2015

Crispy Baked Chicken Parmesan

When I think of my favorite comfort foods, there seems to be a few reoccurring themes. Evidently I really like cheese and fried goodness. This recipe for my Crispy Baked Chicken Parmesan skips right over the bad fried part and goes straight to the melty, cheesy goodness. I love this meal because I can get it to the dinner table in about a 1/2 hour and I feel like I'm getting a really indulgent meal with out a lot of effort in the kitchen or miles to run afterward.

Here is what you'll need for chicken:
1/2c Plain or whole wheat bread crumbs
1 tbsp dry parsley
1/4 tsp garlic powder
Salt and pepper to taste
1/4c Egg substitute or 1 egg, well beaten
1c pasta sauce. I like Wild Oats Organic Sauces
1c Part-skim Mozzarella cheese
1lb Chicken breast strips or thin sliced chicken breasts

For Salad:
6 c Shredded Iceberg Lettuce
1tsp olive oil
1tsp apple cider vinegar
1tsp stone ground mustard
2tbsp fresh lemon juice
1/2 tsp minced garlic
Salt to taste
Black Pepper to taste

For zucchini:
3 medium zucchini
1tbsp olive oil
1 tsp finely minced garlic (I like Spice World Minced "squeeze" garlic)
Salt and pepper to taste

Here's how to make the recipe:
1. Pre-heat oven to 375 degrees. Set up your breading station: Line a pan with parchment paper or foil. Next, place the beaten egg or egg substitute in one bowl and the bread crumbs in another. Add garlic, parsley and 1/4tsp salt and 1/4tsp pepper to the bread crumbs and mix.
2. Dip each piece of chicken or breast strip in to the egg and let excess drip off. Next dip into bread crumbs, lightly pressing to help crumbs stick. Place on baking sheet.

3. Place the baking sheet in the oven. For these strips, the cooking time is approximately 20 minutes. For a larger breast, allow upwards of 30 minutes.


4. While the chicken cooks you'll want to prep your side dishes. For the zucchini:
Rough chop the zucchini while you heat olive oil in a saute pan. Add zucchini, garlic and salt and pepper to the pan and toss to coat with the olive oil. Cook until tender, 5-7 minutes, stirring occasionally.


5. For the salad: Add lettuce to a large bowl with a tight lid. In a small bowl, mix oil, vinegar, lemon juice and seasonings and mix well. Add salad dressing to the bowl and place lid on the container. Shake to distribute the dressing. Immediately divide into serving bowls and top with black pepper.

6. After your chicken is fully cooked, remove from oven and set oven to broil. For these strips I grouped 3 strips together and topped each serving with about 1/4c of mozzarella.

7. Return the chicken to the oven and broil for 2-3 minutes until cheese is melted and begins to brown.

8. Heat sauce in a small sauce pan or microwave. Move each portion to a plate and top with 1/4 of the warmed sauce.

I hope you enjoy this recipe as much as our family does. Feel free to leave comments and suggestions!


Thursday, December 11, 2014

Quick Roasted Potatoes


Even with the very best meal plan in place, real life often intervenes and and that gorgeous but time-consuming meal you had planned gets replaced by a conference call or trip to the pediatrician. That is why it pays to have a few tricks up your sleeve and a few bags of frozen steam-able veggies in your freezer.

My family loves roasted potatoes, but the traditional method takes 45 minutes to an hour. On school nights I need dinner on the table in the shortest amount of time possible and on our busiest nights 45 minutes for a side dish is out of the question. That's where this recipe comes in to play. You can still have the crispy, oven-roasted potatoes you love...in about 20 minutes.

Here is what you'll need:
Fingerling potatoes or new potatoes, about 4oz per person. 4 servings = 1lb of potatoes.
1tbsp olive oil
1tbsp dry parsley
1/4tsp garlic powder, or more to taste
1/4tsp salt
1/4tsp black pepper
non-stick spray
Press and Seal plastic wrap

1. Pre-heat oven to 450 degrees. Clean and rough chop the potatoes into small pieces and place in a large microwave safe bowl. 
2. Toss with olive oil, then add seasonings and mix well until evenly coated with seasonings and oil. I find it easiest to do this with my hands instead of a spoon.
3. Cover bowl with Press and Seal wrap or cling wrap and microwave on high for 7 minutes for 1lb of potatoes. Reduce microwave time for smaller portions.

4. Carefully pour microwaved potatoes into a baking dish sprayed with non-stick spray. Arrange potatoes in one layer and bake for 15 minutes, stirring once half way through cooking to brown potatoes on all sides and prevent them from sticking.

5. After 15 minutes, stir once more, and set oven to broil. Continue cooking on broil for 4-5 minutes, keeping a close eye on your potatoes. You want them browned, not burned.
6. Remove from the oven and taste for "doneness" and season if needed. We had these delicious potatoes with steamed green beans and (bunless) Morning Star Farms Chipotle Black Bean Burgers topped with cheddar cheese.

There you have it. Quick roasted potatoes with slow roasted taste. Enjoy! Feel free to leave comments or suggestions.

Monday, December 8, 2014

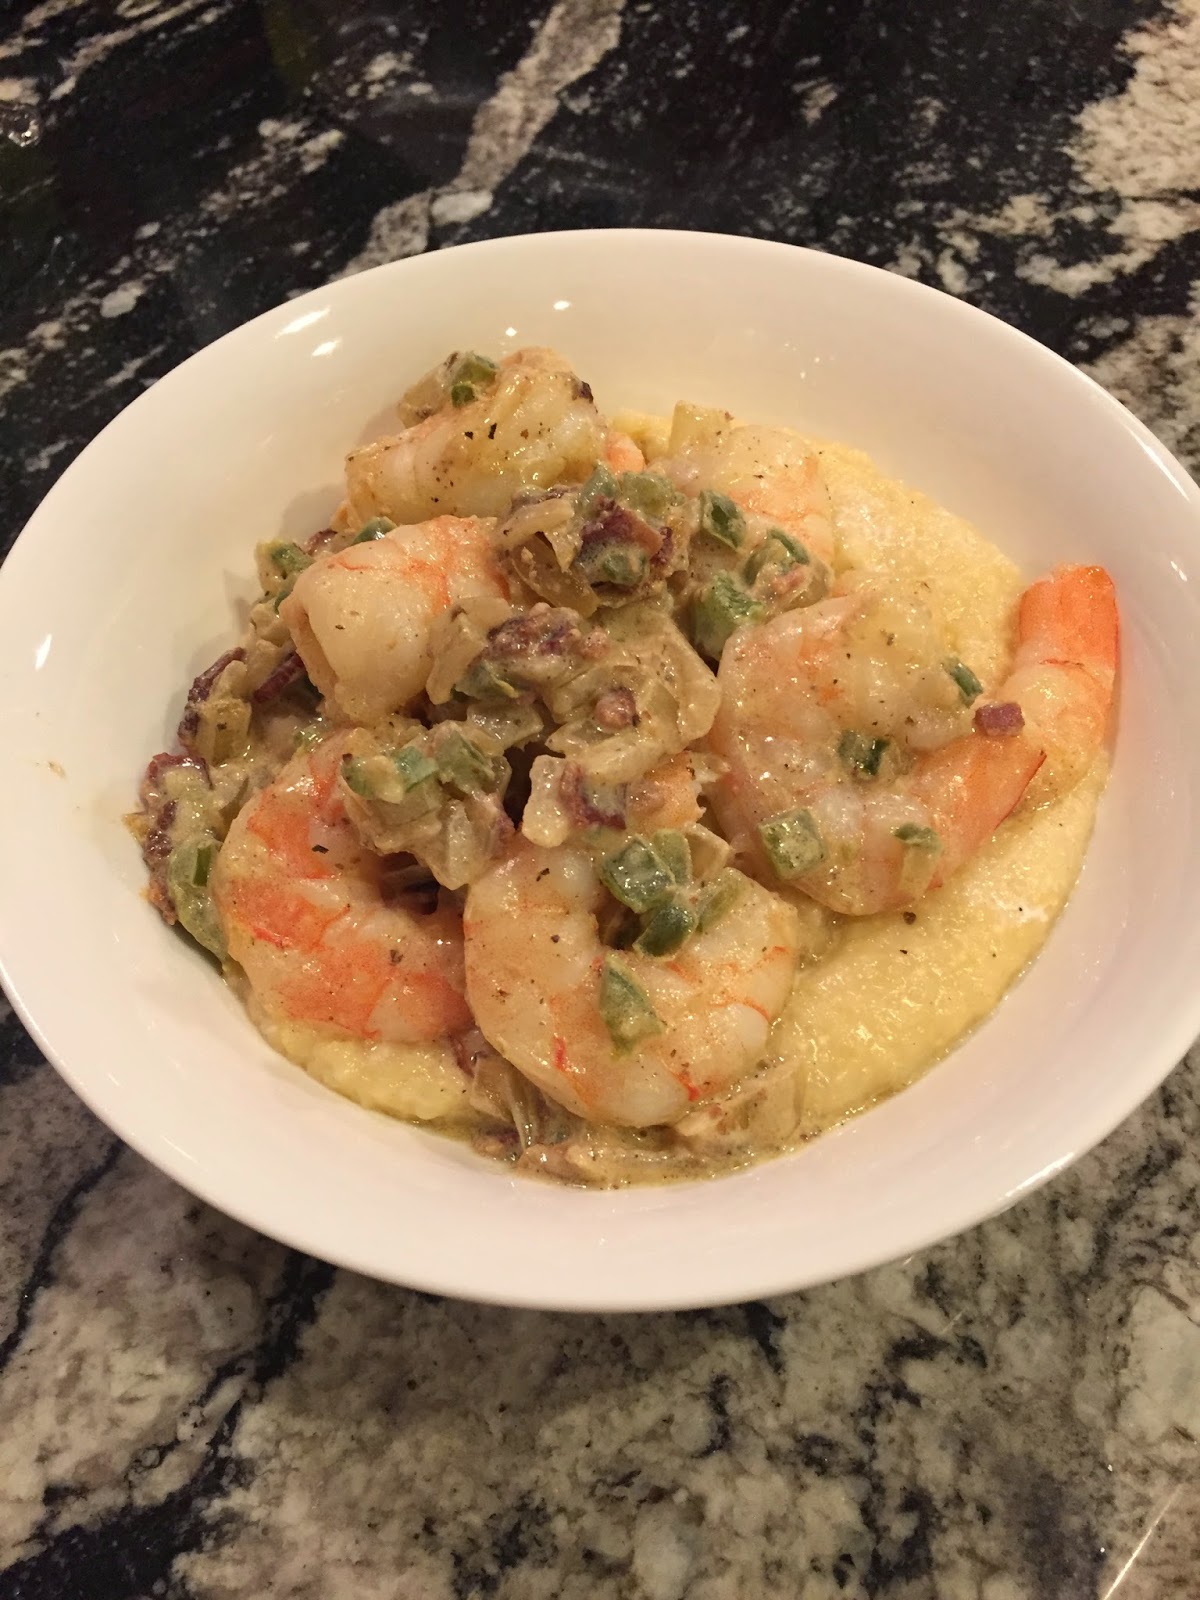
Guilt-free Shrimp and Grits


I was raised in the South, but somehow I can't remember a single time that shrimp and grits ever made it onto our dinner table. I can't even remember grits being on the menu at all for that matter. Cream of Wheat, yes. Grits, no. I blame that one on having parents raised far closer to Canada than Mexico. And yes, I said blame because its a shame we weren't eating this more often. Its so good!

This recipe requires you to pay a little more attention than most of my recipes, mostly because of the shrimp. They overcook quickly if you aren't watching what's happening in the pan. However, the extra effort is so worth it. The creamy, cheesy cheddar grits are perfect with the heat of the shrimp and the crispy, salty bacon adds...who am I kidding...its bacon. It makes everything awesome.

Here is what your'll need:
1lb Large or Jumbo shrimp, raw, shelled, de-veined
3/4c quick grits (not instant)
1 14oz can chicken broth
1c water
1/4 tsp black pepper
1/2c sharp cheddar cheese
2 strips of bacon
1/2 a large yellow onion, finely chopped
1/2 a green bell pepper, finely chopped
1 tsp garlic, finely chopped
1/4c fat free half and half
1 tsp Tabasco sauce (optional, omit for non-spicy shrimp and grits)


Here's how to make the recipe:
1. In a sauce pan bring 1c chicken broth and 1c water to boil and whisk in grits and black pepper. Cook according to the package directions.

2. In a large sauté pan over medium heat, fry bacon until crispy. Remove bacon from pan and transfer it to a paper towel, leaving he residual bacon fat in the pan. 

3. Add finely chopped onion to sauté pan and cook until translucent, 3-4 minutes. Add finely chopped bell pepper and garlic and continue to cook until peppers are soft, 2-3 more minutes.

4. Push onions, peppers and garlic to the outer edge of the pan and add shrimp in a single layer in the center of the pan and lightly season with salt and pepper. The shrimp cooks quickly. It only needs about 2 minutes (or less) on each side. You want to cook it until it is no longer pink and translucent, but is still tender.

5. As soon as shrimp is cooked through, lower the heat to simmer and stir in half and half, being sure to scrape up all the tasty bits of bacon and veggies off the bottom of the pan. Add Tabasco sauce, if desired. I loved the spicy kick, but I removed the kid's shrimp from the pan before I added the Tabasco sauce.

6. Turn your attention back to your grits. Give them a good stir. I like my grits to be a little looser, so I ended up stirring in the remaining chicken broth, about 1c of additional broth. Add cheddar cheese and mix well.Continue to stir until cheddar is melted. Season as needed with salt and pepper.

7. Divide grits into serving bowls and top with shrimp and sauce. Serve immediately. Enjoy!

I served ours with a side of zucchini. It is just two rough chopped zucchini sauteed with 1/2tbsp olive oil and 1tsp minced garlic with salt and pepper. Cook over medium heat until tender, about 5-7 min.


I’d love to hear what you thought of the recipe. Please feel free to leave comments!


Tuesday, November 11, 2014

Easy Personal Pita Pizzas


"Any pizza is a personal pizza if you try hard and believe in yourself"
- Bill Murray, via Twitter

That quote has always cracked me up, but seriously who doesn't love a pizza catered to what you love? I was always the whiny kid picking the mushrooms and olives off of the supreme pizza while complaining that the residual olive flavor had ruined any hope of a good-tasting piece of pizza. Don't even get me started on picking those things out of spaghetti sauce. I could make a meal last hours if there was an errant vegetable in my sauce. Thankfully I've embraced vegetables as an adult and gotten creative about sneaking them into my kids meals. Its true...learn from the past or be doomed to suffer through the behaviors your children surly inherited from your own olive-hating DNA.

Tonight we went vegetarian with our pizzas, but you could easily add any protein you like: chicken, turkey pepperoni, thinly sliced steak, ground turkey sausage, ham/ bacon or even shrimp. Basically any fully-cooked protein will work. We are a pretty basic bunch so (not so) plain cheese works great for us.

Here's what you'll need per pizza:
1 Joseph's Pita
1/2 tsp olive oil
2-3 shakes of dry garlic powder
2 tbsp marinara or pizza sauce of your choice
2 tsp basil paste or fresh herbs
1/3 cup mozzarella cheese or part-skim mozzarella
1/2 tsp dry parsley
drizzle balsamic glaze
Protein of choice (optional)
Veggies of choice (optional)

Method:
1. Pre-heat oven to 450 degrees.
2. Line a cookie sheet with foil and lay pitas on the sheet without overlapping the edges.
3. Spread olive oil over the pita concentrating on the "crust" edge, then sprinkle crust with garlic powder.
4. Spread marinara sauce and herb paste over the oiled crust.
5. Top with any meats you might be adding and sprinkle cheese evenly over the crust.
6. Sprinkle top of pizza with dry parsley.
7. Slide your cookie sheet in to the oven and lower temperature to 425 degrees.
8. Cook 8-10 minutes or until cheese begins to brown and bubble.
9. Drizzle with balsamic glaze and enjoy.

*Note that if you add vegetables with a higher natural water content, like zucchini and tomatoes, they will affect the crispiness of your crust. I prefer to de-seed fresh tomatoes to cut the moisture content or better yet try sun dried tomatoes.

**If you want to take these to the next level, try thinly slicing fresh mozzarella in place of the shredded cheese and broil on low for the last minute or two of the cooking time. So good!

If you are unfamiliar with any of the ingredients this recipe calls for, here is a little help: